I recently got bit by the decorating bug. Inspired by blogs like
this and the recent Better Homes and Gardens special publications magazines, I have set out to create my dream home. The current global financial crisis is the perfect opportunity for me (and all of you creative geniuses) to exercise and test the creative spirit and seek the most cost effective and environmentally friendly methods for sprucing up the pad. I can't wait (
insert knuckle cracking here).
If only I could blog as fast as I get ideas and implement them. Oh well, stay with me because I have every intent on sharing these tips that I have all lined up in my head. I've been doing a lot of research and here is my intro to the upcoming posts: I've decided that nearly everything that is mass manufactured can be created at home with just a few supplies and a little imagination.
A few weeks back we did a power paint, blasting through our main floor (kitchen, dining, living room and foyer) with a paintbrush and some eco-friendly, fumeless paint. I needed color after looking at the very long, white months of winter looming on the other side of the window. The new color and beauty of the walls spurred on a mass weeding and organizing frenzy that was long overdue. One closet led to another... and all of that led me back to one of my favorite home spots: the kitchen.
I am on a quest to eliminate the particleboard pantry that is hogging up our eating corner. So, my bestest decorator friend in the whole world, Christina, shared her wisdom. Aparently, the latest and greatest kitchen pantry is a simple shelf on the wall where all of the pantry goods are neatly organized in beautiful containers (
see here). Luckily, I already had some beautiful containers that I was working on organizing at this time yesterday. Did I mention how very much that I love my
Dymo labeler???

I should have taken a before shot of Azure's crunchy jar. I felt sorry that her food was being stored in a plastic, beaten down pretzel container that we had from nearly five years back. I started looking around for options and found
this. So I put it on my wish list. And then...
Let me introduce you to our former rice container. In about fifteen minutes upon my arrival home after a lovely walk with the boys I crammed this little project in between snack time and the wee one's nap. It was totally simple and I love the results especially since it didn't cost a cent. Let me show you...

1. Gather your supplies.
Container, plastic or glass, either a recyclable like a peanut butter jar (I have a thing for those don't I?) or something you bought for storage.
Acrylic paint
Paintbrush
Marker (I used a Sharpie)
Clear fingernail polish

2. Draw a design on the jar with your marker. I freehanded this one but you can always tape a clipart to the inside of the jar and trace around it.
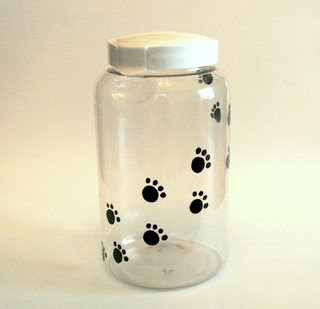
3. Paint over your tracing. This took two coats of paint. When the paint is dry you can seal it with the clear polish.

Tahdah!! A personalized jar for the kitty crunchies. I think Azie knew that I was creating something for her because she spent the duration of my project rolling over and over at my feet. Silly kitty.
You could really go crazy designing jars for all sorts of things. Use any color or pattern you can think of and enjoy the satisfaction of saving a dime and creating something truly unique!
 These little hands that help today
 Just roll out the size and shape of dough that you want your handprint on and press those little fingers or toes into it. You will have to let the clay dry for at least 24 hours and then be sure to write the name of the person, age and date. Then just stick it to the mat and hang it up!
 I think my little hands compliment my other pieces of "art" in the kitchen.
 They all reflect the mood of raising children, don't you think?


 Posts
Posts

