Showing posts with label Tutorials. Show all posts

Tuesday, June 15, 2010

The Hair "Bow"

A couple of my dear, daughter-raising friends were looking for a cute DIY flower "bow" to kick their creativity in gear for the season. Here is what we came up in fifteen minutes with a hot glue gun and some quick thinking.

What you need:
a cute, silk flower (or paper or fabric or whatever inspires you)
a barrette and/or piece of elastic (I used some foldover elastic I had on hand)
a hot glue gun (or, if you're patient, some "snail-dry" glue)


1. Look around your house for a cute jar of pretend flowers from which you might not notice if one went missing.

2. Pop the flower off the stem and remove all center plastic pieces that hold it together.

3. Stack the flower forms on top of each other. I used two different colors of flowers and alternately layered them. Glue each piece on top of the next.


4. Look through your craft stash and select the most perfect and inspiring centerpiece. I ended up choosing buttons for my orange "bow" but for my red flower I put blings in the center. Glue them on.

5. Measure your recipient's head and cut your elastic accordingly. Overlap the ends and glue together. Glue the band to the flower as shown.


6. And then, I got a better idea. What about making a headband with interchangeable flowers? Just glue the completed flower onto a barrette and snap it onto the headband. Now you have one for each outfit. Neat huh?

By the way, I admit that I made the red one for myself. It's not just for little girls!

Monday, June 15, 2009

My Helping Hands


These little hands that help today
Will make a mess, explore and play.
Be patient with them while they're small
For hands grow big as legs grow tall.

My childhood home was like any home across the country in that the central hub was the kitchen. I have fond memories of making mini pies in foil pot pie plates with my mom after a summer afternoon picking mulberries in the park across the street, prize fish caught from the lake fried for dinner, hours of chatting over a simple breakfast bagel, Kook-Aid stained lips, screen doors, steamed up windows on Thanksgiving morning and the list goes on... For years on the wall between the two windows that overlooked my favorite tree swing in the backyard were two little plaster handprints and one small, sandy footprint. I remember marveling at how the casts seemed to shrink with each new year.

With Cam starting Kindergarten next year it has occurred to me how very fast these years are moving and just how grown up the kids are becoming. So, to capture my little helping hands I decided to take a lesson from my mom's plaster casts. You can buy handprint kits that give you the frame, mat, and materials but I was able to match my kitchen decor with some IKEA frames that I had on hand and purchasing the clay only (which was far less messy than the plaster used decades ago).

Supplies:

Crayola "Model Magic" (ok, I purchased a super huge box of it because I have no control when it comes to craft supplies and I will surely come up with something to use the rest for- one small package will do for your project)

a small hand
a rolling pin
your choice of frame and mat (I used construction paper for the background because it is all I had on hand but it will probable fade over time)
mounting material (tape or glue of some sort)

Just roll out the size and shape of dough that you want your handprint on and press those little fingers or toes into it. You will have to let the clay dry for at least 24 hours and then be sure to write the name of the person, age and date. Then just stick it to the mat and hang it up!


I think my little hands compliment my other pieces of "art" in the kitchen.


They all reflect the mood of raising children, don't you think?

Monday, April 27, 2009

DIY: Natural Rock Drawer Pulls

This is, quite possibly, my best invention yet. Do you remember when I declared that everything that is mass manufactured can be made right at home? Well, here is more proof. In my current decorating frenzy I set out to put some cupboard/drawer pulls on my kitchen cupboards. I had just recently torn out an advertisement from a home improvement magazine for some beautiful rock pulls that are currently selling for a minimum of $10 per piece (go ahead and see for yourself- just Google "stone drawer pulls"). Well, I decided that this natural and beautiful hardware would make my cupboards look lovely but I could already hear my checkbook wailing from inside of my new purse. Nevertheless, I still had to have them.

So, again with the terrific knowledge of nuts and bolts that my husband stores away in his brain and a complete raid of my decorating closet, I came up with the exact same product for about $1 each. Here's how you can make one too:

Here's what you need:

Polished rocks (found in the home dec section of any store including your local dollar store or pick up your favorites on the beach)

Epoxy glue

Cap Nuts (I bought mine at McMaster-Carr item #90835A300 1/4"X20 and 12mm length)

Machine Screws (McMaster-Carr item # 90271A542 1/4X20 and 1" length)

Dremel or sandpaper for roughing up surfaces

First, rough up the surfaces of your rocks and cap nuts. This will help the glue to stick better.

Mix up the epoxy following the directions on the package. Dip the cap nut into the epoxy and place on the rock to dry. You won't need too much glue on the nut and if you do get too much on you run the risk of it sliding off of your rock before it is dried.

Tah-Dah!! I purchased a mounting template that helped me mark where I wanted the pulls to be. Drilling was a piece of cake and the kids even helped me put the screws through the holes and twist the pulls on.

I am so impressed with the success of this project that I'm already scheming up new places in my home I may put them (buttons in the craft lab?) You could use nearly anything other than rocks for a unique look. What will you use?

Wednesday, March 18, 2009

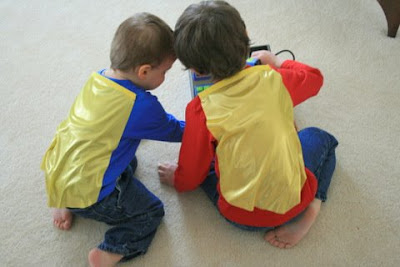
DIY Superhero

Everyone loves a superhero. Since seeing "The Incredibles" for the first time a few months back, Cam has become a new hero each day and frequently passes out costumes for each of us to wear along with instructions for how to use our individual super powers. So, I decided to make it official for him and his brothers for his birthday last month. He has made it clear that I and his daddy are to have a shirt as well. Maybe I'll do that next week... Anyway, these shirts were really fun and easy to make and have been the perfect way for me to identify my children quickly on crowded kiddyland play dates away from home.

If you keep your eyes peeled near the end of a season you can pick up some fantastic deals on simple long or short sleeved shirts that are perfect to embellish. I found these for $2.50 each. I bought a shirt for each of the older boys and a long sleeved onsie for the little one.


Here's what you need:

Ready made shirt washed and dried to shrink it (you can do this twice to be sure)
Two contrasting colored shirts to cut up for the applique in the same type of fabric as your ready made shirt (I used a stretch jersey)
Heat N Bond
*Matching thread and a sewing machine
Two pieces of hook and loop tape such as Velcro or snaps
Fabric for cape
Bias tape
Glue stick
Wrapping paper, newspaper or whatever large paper you can find to trace the cape pattern

*If you cannot sew simply applique your shapes with fabric puffy paint available at any craft supply store instead of using thread.

1. Using a computer drawing program or drawing freehand, plan the shape of your emblem and choose your font. The simpler, the better. Lay it out on the shirt to be sure it fits.

2. Trace your shape onto the paper side of the Heat N Bond.

3. Iron the Heat N Bond onto the wrong side of your your emblem applique fabric and the letter applique fabric according to the instructions. Cut the shapes out following your traced line.

4. Now press your letter onto the emblem following the Heat N Bond instructions.

5. Sew around the letter using a zig zag stitch and backstitch at the corners. If you are not using a sewing machine for this project now is the time to break out the fabric puff paint and use it to outline the letter.

6. Here is the back side of the appliqued letter with the paper backing still attached.

7. Peel the paper backing off of the emblem being extra careful to avoid ripping out any of your stitches. Don't worry too much about the small pieces of paper left between the zig zags as these will be be hidden when it is pressed to the shirt.

8. Press the emblem to the front of your ready made shirt. Using the same zig zag stitch sew around the emblem being careful to avoid catching the back of the shirt as you applique. Use puffy paint here if you are not sewing.

9. I used an inexpensive cut of a shiny novelty knit for the cape. There was no need to hem the raw edges- yay!

10. Measure the distance between the shoulders where the cape will be attached and draw a line using this measurement on your pattern paper. Put a dot on the halfway point of this line. Measure how long you want to cape to hang and draw a point that distance down from the halfway dot on the line. Now finish the drawing by adding lines like my pattern above. Cut out the pattern, lay it on the fabric and then cut out the cape.

11. Glue the bias tape onto the top of the cape and then sew it in place. Use a permanent fabric glue if you are not sewing to keep the tape in place.


12. Sew or glue the hook and loop tape or snaps in place on the shoulders and the cape. If you use hook and loop tape be sure to cut the corners off of your squares so they do not scratch or become caught on other clothes in the washer.


Put it on your little one and marvel at your adorable super hero! Then, go ahead, make one for yourself too- everyone wants to be a hero...
Friday, March 6, 2009

Organizing Frenzy and Azie's DIY Jar Of Crunchies

I recently got bit by the decorating bug. Inspired by blogs like this and the recent Better Homes and Gardens special publications magazines, I have set out to create my dream home. The current global financial crisis is the perfect opportunity for me (and all of you creative geniuses) to exercise and test the creative spirit and seek the most cost effective and environmentally friendly methods for sprucing up the pad. I can't wait (insert knuckle cracking here). If only I could blog as fast as I get ideas and implement them. Oh well, stay with me because I have every intent on sharing these tips that I have all lined up in my head. I've been doing a lot of research and here is my intro to the upcoming posts: I've decided that nearly everything that is mass manufactured can be created at home with just a few supplies and a little imagination.

A few weeks back we did a power paint, blasting through our main floor (kitchen, dining, living room and foyer) with a paintbrush and some eco-friendly, fumeless paint. I needed color after looking at the very long, white months of winter looming on the other side of the window. The new color and beauty of the walls spurred on a mass weeding and organizing frenzy that was long overdue. One closet led to another... and all of that led me back to one of my favorite home spots: the kitchen.

I am on a quest to eliminate the particleboard pantry that is hogging up our eating corner. So, my bestest decorator friend in the whole world, Christina, shared her wisdom. Aparently, the latest and greatest kitchen pantry is a simple shelf on the wall where all of the pantry goods are neatly organized in beautiful containers (see here). Luckily, I already had some beautiful containers that I was working on organizing at this time yesterday. Did I mention how very much that I love my Dymo labeler???


I should have taken a before shot of Azure's crunchy jar. I felt sorry that her food was being stored in a plastic, beaten down pretzel container that we had from nearly five years back. I started looking around for options and found this. So I put it on my wish list. And then...

Let me introduce you to our former rice container. In about fifteen minutes upon my arrival home after a lovely walk with the boys I crammed this little project in between snack time and the wee one's nap. It was totally simple and I love the results especially since it didn't cost a cent. Let me show you...
1. Gather your supplies.

Container, plastic or glass, either a recyclable like a peanut butter jar (I have a thing for those don't I?) or something you bought for storage.

Acrylic paint
Paintbrush
Marker (I used a Sharpie)
Clear fingernail polish

2. Draw a design on the jar with your marker. I freehanded this one but you can always tape a clipart to the inside of the jar and trace around it.

3. Paint over your tracing. This took two coats of paint. When the paint is dry you can seal it with the clear polish. Tahdah!! A personalized jar for the kitty crunchies. I think Azie knew that I was creating something for her because she spent the duration of my project rolling over and over at my feet. Silly kitty.

You could really go crazy designing jars for all sorts of things. Use any color or pattern you can think of and enjoy the satisfaction of saving a dime and creating something truly unique!

Friday, February 13, 2009

Green Craft: Camping Lantern

Maybe its cabin fever or just another whim but the boys have recently taken a strong interest in camping. This, of course, excites their nature-loving outdoorsdad who would-if-he-could live high on a mountaintop in a cabin built of sticks. So, taking the role of the ever-encouraging mom and wife I decided to make the kids a portable "Coleman" lantern for their indoor journeys under tents made of sheets and chairs. The best thing is that it was constructed using materials that I already had on hand along with a very nifty little battery operated votive candle that really flickers. I found mine at the $ store but since LED lights are becoming so popular you can find these votives almost anywhere.

What you need:

Two empty identical plastic jars with lids from peanut butter, mayonaise or any other recyclable
Wax paper (although any white paper will do: freezer paper, parchment, printer, etc.)
Wire or rope for a handle
One battery operated votive candle
Glue stick
Tape
Drill or Dremel
Hot glue gun or other strong glue


1. Clean out one of your empty jars and take any sticky lable goo off of the outside with something like Goo Gone. You only need the lid from the second container.

2. Measure and cut three pieces of waxed paper to fit around the inside of the jar with just 1/4" or so of overlap.
3. I used a glue stick to glue the ends of the three papers together before taping them together to form a tube. Place the tube in the jar.

4. Now you need to drill a hole on either side of one of your lids. Try to line them up directly across from each other.
5. Thread the ends of the wire or rope through the two holes. Pinch the ends of the wire or knot the ends of the rope to keep them put.
6. Now drill a larger hole into the bottom of the second lid. You can use an exacto knife to cut off any extra plastic.
7. Line up your votive on the inside of the lid so the switch is centered over the hole. Draw a circle around the votive for reference and then hot glue it down.
8. Now hot glue the handle lid to the bottom (closed) end of the jar and screw the candle lid onto the former top (open) end of the jar.
Tah-Daaaaaaahhhh! Turn it on and watch it flicker and glow! I was happy to see that Cam had a much easier time turning on the switch than I did since his fingers are small enough to fit into the hole. The candle advertised that it would last up to 60 hours. I've got the stopwatch timing. When it "burns out" I will just remove it and replace the battery before regluing it down.

You could get carried away with these and draw little pictures on the inside paper so they look like shadows if you want. I have already commissioned the husband to work on rewiring the votive's circuit for a future project that I have in mind. So many possibilities. I like this lantern plain, though, and think it is remarkably similar looking to the original Coleman.

Now I really can't wait until the sun comes out again...

Wednesday, February 4, 2009

Turning Five

Tomorrow is the big day. It is the one that I never thought would happen when I brought my first little bundle home from the hospital. Here is the first batch of celebration that Cam will take to preschool to share tomorrow for his fifth birthday. I cannot take credit for the brilliant idea of stuffing a mini cookie in the face of a Cookie Monster cupcake but I think my version turned out quite nicely considering the volume and energy of the wee ones running around me as I worked.


What you need:

Cupcakes
Frosting
Food coloring or icing color (I used Wilton's Royal Blue)
Cookies such as Mini Chips Ahoy or regular Chips Ahoy cut in half
Brown M&M's (for the pupil)
White disc candy such as Brach's Peppermint Lozenges


1. Cut a slit in one side of the cupcake.

2. Stuff the cookie inside...
Special note: In retrospect, I am looking at the original inspiration for these cupcakes and realize that the designer used a full sized cookie rather than a small cookie. It was probably cut in half and stuffed into the cupcake. This would make the monster's mouth look much wider like he appears on Sesame Street. I'll have to try this again for the next kid...


3.... and frost it with frosting using a medium star tip. I put two blobs of frosting just above the cookie before pressing the eyes on.

Don't worry, we're taking along a bag of pretzels, carrots and a gallon of milk too...
Posted by Picasa